1PACKAGING CONTENTS

- main module
- locking screw
- Allen wrench
- special tool
- oval-head screw
- 2 Countersunk head
screw- 3 dowels
- sealing rubber
- wall module
- power supply
2LOCK SEAL

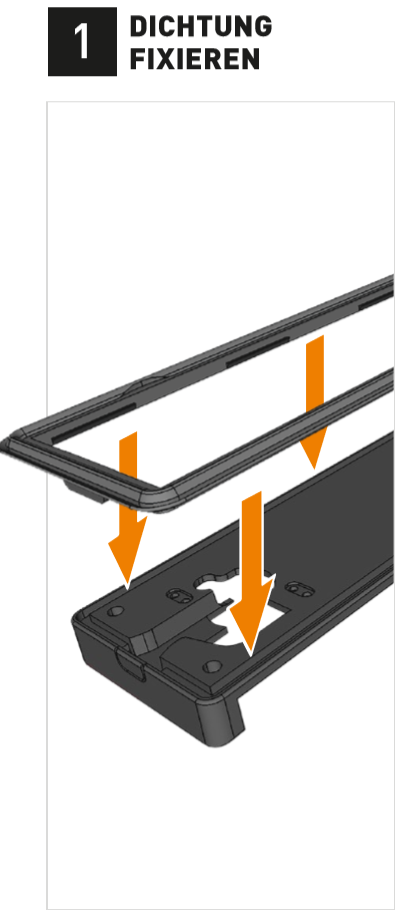
The X2C TimeTerminal can be protected against dust and water splashes (according to IP 65). For this purpose, the enclosed rubber seal is inserted into the guide of the main module.
3MONTAGE WALLMODULE

The wall module has three screwing points. The drilling points are marked with orange arrows.
TIP: Use the picture to mark the drill holes.
4PREPARE SEAL

To make it easier to insert the main module, the sealing rubber at the corners should be folded back completely.
5NETWORK- AND POWERCONNECTION

Now connect the network cable and the power supply. If the network provides a power supply via Ethernet (PoE), the connection of the power supply unit can be omitted. Uninstallation1: If it is necessary to replace the wall module, the network connection must be pressed down with light pressure to unlock the locking clip on the plug.
6INSERT HOUSING INTO WALL MODULE

The housing is placed just above the wall module and then moved downwards. The module snaps into place at the bottom.
The sealing rubber is now folded against the housing so that the space between the wall module and the main module is sealed all the way round.
7SCREW IN LOCKING DEVICE

Fix the housing to the wall module with the enclosed locking screw and the Allen key provided for this purpose. Uninstallation: If the housing is later to be separated from the wall module, the screw must be unscrewed to the left.
8INSERT PROTECTIVE CAP

The protective cap protects the main module against unauthorized theft. Uninstallation2: To remove the protective cap, please use the special tool provided. Insert the tool diagonally from above until the two grippers engage, push the tool downwards and then pull out the protective cap to the back.
10COMMISSIONING-ASSISTANT

After the first boot process, the terminal automatically starts the commissioning assistant. Configure the basic settings.
11SYNCHRONISATION MAIN MODULE/WALL MODULE

The X2C TimeTerminal is equipped with intelligent memory management. Settings can be synchronized from the main module to the wall module or from the wall module to a new main module. This enables an autonomous service process, since when a component is replaced, only the configuration data has to be loaded from the memory.
12SERVICE-CASE

If it should become necessary to replace the main module during service, the new main module automatically starts in the memory management.
The beige symbol indicates that the front memory is still unconfigured. Copy the configuration to the new main module via the corresponding menu item "Copy BACK -> FRONT".
After the configuration has been transferred (green equal symbol in the status bar), press "Back" to return to the start screen.
14OPEN CONFIGURATION MENU

The configuration menu can be accessed via a wipe gesture on the multitouch display.
- Place two fingers (preferably index and middle fingers) on the position indicated in the illustration.
- Now wipe down with both fingers to the white date/time field.
- now wipe both fingers upwards to the starting position. Once in the starting position, remove your fingers from the display.
IMPORTANT: The fingers must touch the display during the entire wipe gesture.
15ENTER PASSWORD

Now enter the password entered in the configuration. If a connection to the host system/ASDIS already exists, the password stored there must be used.
16SETTINGS

At this point you can configure or view all essential settings of the terminal:
DEVICE SETTINGS,
such as IP and terminal identification and host connection,
GENERAL SETTINGS,
like time zone, admin password and EEPROM management,
DEBUG-INFORMATIONEN,
such as logs, terminal activation and firmware version.


 Deutsch
